
Two tools a lot of creators already use just got real upgrades this week. Google Flow can now lock a start frame and an end frame and generate everything in between. Photoshop can now take a scribble and a sentence and actually understand what you mean.
Neither update is complicated once you see it in action. Both change how you should actually work, not just what buttons exist. Here is exactly how to use them.
Key Takeaway
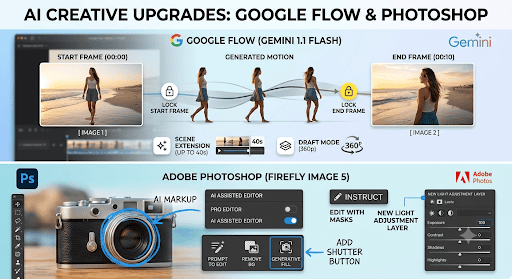
Google Flow’s Gemini Omni 1.1 Flash lets you set a start frame and an end frame and generate the motion between them, extend scenes up to 40 seconds in 10-second chunks, and draft cheaply at 360p before upscaling to 4K. Photoshop’s new AI Assisted Editor lets you draw or click directly on an image and describe the change in plain language, instead of writing a long prompt and hoping it lands in the right spot. Both are live now. Neither requires a workflow overhaul, just a few new habits.
Part One: Google Flow and Gemini Omni 1.1 Flash
Google rolled out Gemini Omni 1.1 Flash inside Google Flow on August 27, 2026. It is available now to Google AI Plus, Pro, and Ultra subscribers, with scene extension also showing up inside the Gemini app directly. Four things changed. Start and end frame control. Longer scene extension. A cheap draft mode. Upscaling to 4K.
Here is what each one actually does, and how to use it.
How to Set a Start Frame and an End Frame
This is the headline feature, and it solves a real problem. Before this update, you described a scene in words and hoped the camera move landed the way you pictured it. Now you can show Flow exactly where the shot starts and exactly where it ends, and let the model fill in the motion between those two points.
To use it, upload or generate your starting image first. Set that as your start frame. Then upload or generate a second image showing where you want the shot to land, a wider view, a closer view, a different angle of the same scene, and set that as your end frame. Flow analyzes both and generates the continuous movement connecting them.
This is built specifically for camera orbits, zoom transitions, and looping clips. A slow push into a product shot. A pull-back reveal. A loop that needs to end exactly where it started so it plays seamlessly on repeat. Any shot where you already know your first frame and your last frame, and the only question is how to get from one to the other smoothly, is what this feature is for.
One practical tip. The closer your two frames are in composition, lighting, and subject position, the cleaner the generated motion tends to be. A huge jump between start and end asks the model to invent a lot in between, and that is where quality drops. Start with a modest transition, confirm it looks right, then push for something more ambitious once you trust how the model handles your specific subject.
How to Extend a Scene Past 10 Seconds
Individual generations from Omni 1.1 Flash still run 3 to 10 seconds. What changed is what happens when you extend one. The model now looks at up to 10 seconds of your existing footage before continuing it, instead of just the final second like earlier versions did.
That is a real difference. More context means the extension is far more likely to keep the same character, the same lighting, and the same sense of what is actually happening in the scene, instead of drifting into something disconnected.
You can chain extensions in 10-second increments up to a cumulative 40 seconds total. That is not one 40-second generation, it is four connected 10-second segments, each one built on the last.
Treat each extension as its own decision point rather than queuing up all four in advance. Watch the first extension before requesting the second. If continuity is drifting, that is the moment to adjust your prompt or your reference, not after you have already spent credits on three more segments.
How to Draft Cheap and Upscale Smart
This is the workflow change most people will feel immediately. Flow now has a 360p draft mode that renders roughly 60 percent faster and at about a third of the cost of a standard 720p generation.
The point is not to publish 360p footage. The point is to stop burning full-price credits on ideas that do not work.
The practical workflow: generate three or four variations of a shot at 360p first, changing one variable at a time, a different camera angle, a different pacing, a different lighting mood. Compare them side by side using Flow’s Draft Room.
Pick the one that actually works. Only then upscale that single version to 1080p or 4K for the final export.
This flips the old habit of generating once at full quality and hoping. Cheap, fast iteration first. One expensive final render second. That order saves both money and time, and it is worth building into your process even outside Flow specifically, since it is how most AI generation tools reward you for using them.
One more detail worth knowing if you are building through the API rather than the consumer app. Google prices Omni 1.1 Flash output at roughly $17.50 per million tokens, which works out to about $0.10 per second of standard 720p footage. Separate rates for 4K and 360p have not been published yet, so budget around the 720p figure until Google clarifies the rest.
How to Use Video References
You can now drop in up to three seconds of an existing video clip as a reference, separate from setting a start or end frame. Flow uses that clip to understand movement style, visual context, and character consistency, then applies that understanding to a new generation.
This is useful when you already have one clip that nails a specific camera move or a specific character look, and you want more footage that matches it without describing the whole thing in words again. Feed the clip in as a reference instead of trying to reconstruct it through a text prompt.
Part Two: Photoshop’s AI Assisted Editor
Adobe’s update landed a day earlier, on August 27, 2026, and it is a genuinely different way of working in Photoshop, not just a new filter. There is now a second workspace inside Photoshop called the AI Assisted Editor, sitting alongside the traditional interface, which Adobe now calls the Pro Editor.
How to Switch Into the AI Assisted Editor
There is a toggle right on the menu bar that switches you between the Pro Editor and the new AI Assisted Editor. If you decide you do not want it cluttering your interface, you can hide it entirely through Settings. It is opt-in, not a replacement for the tools you already know.
Inside the AI Assisted Editor, seven tools sit in a vertical toolbar: Prompt to Edit, Remove Background, Generative Expand, Remove Tool, Generative Fill, Generative Upscale, and AI Markup. Every one of these already existed in Photoshop in some form. What changed is that they are now grouped into one simplified workspace built around a natural-language prompt bar, instead of scattered across menus.
How to Use AI Markup
This is the tool worth learning first. Instead of writing a long, careful prompt describing exactly where something should change, you draw directly on the image. A rough circle around an object. An arrow pointing at a spot.
A quick click on a specific region. Then you add a short instruction, something as plain as “change this shoe” or “add a banner here that says ON SALE NOW.”
Photoshop combines your visual mark with your text and applies the edit through Firefly Image 5, Adobe’s current image model. The advantage over a pure text prompt is precision. Describing “the shoe on the left, not the one in the background, the one partially behind the bag” in words is clumsy. Circling it and typing “change this shoe” is not.
Use AI Markup specifically when a change is spatial, when the instruction depends on where something is in the frame rather than what it is. For edits that are not about location at all, replacing a color palette, changing a mood, adjusting overall style, a straightforward text prompt in Prompt to Edit still works better, since there is nothing to point at.
How to Use Instruct Edit With Masks
This one lives in the standard Pro Editor rather than the new simplified workspace, and it solves a different problem. Roughly select the specific area of an image you want changed using a mask, then describe the edit in a prompt. Photoshop now reads the lighting and perspective of the full image before making that edit, not just the masked region in isolation.
Practically, this means an edit like opening someone’s closed eyes or adding a hat is far less likely to look pasted on. The shadow falls the right direction. The color temperature matches. That full-image context is what previous masked editing tools in Photoshop tended to miss, and it was the most common complaint about generative edits looking obviously fake.
How to Use the New Light Adjustment Layer
This is not AI at all, and it is easy to miss inside an update mostly about AI tools, but it is genuinely useful. Adobe added a Light Adjustment Layer with Exposure, Contrast, Highlights, Shadows, Whites, and Blacks controls, built directly into Photoshop’s normal layer stack.
Before this, getting Camera Raw-level lighting control usually meant leaving Photoshop entirely and working in Lightroom, then bringing the file back in. Now that same level of control lives inside a layer you can toggle, mask, and adjust non-destructively without ever leaving your existing project. If your workflow has been bouncing between Lightroom and Photoshop just for lighting adjustments, this update removes that round trip.
Putting Both Tools to Work Together
These two updates were not built to work together, but they fit naturally into the same pipeline if you are producing content across video and stills.
Generate and extend your video in Flow using the 360p draft workflow first, confirming the shot before spending credits on a full render. Once you have a final clip, pull a still frame from it for a thumbnail, a promotional image, or a social post. Bring that still into Photoshop’s AI Assisted Editor and use AI Markup to make targeted adjustments, swap a background element, add text, clean up a distracting detail, without redoing the video generation just to fix one still image.
This mirrors the same lesson worth carrying across every AI video tool covered on this site, including Dreamina’s Seedance system and Grok Imagine’s reference tools. Generation and editing are two separate jobs. The tool that generates your footage rarely is, and usually should not be, the same tool that polishes your final still images and thumbnails.
Mistakes to Avoid With Both Updates
The most common mistake with Flow’s new start and end frame control is picking two frames that are too different from each other and expecting a clean result. Ease into it. Small transitions first, ambitious ones once you understand how the model handles your specific footage.
The second mistake is skipping the 360p draft step entirely and generating straight at full resolution every time. That habit is expensive, and it is exactly what the draft mode exists to fix. Draft cheap. Confirm the idea works. Upscale once.
On the Photoshop side, the mistake is reaching for a long, detailed text prompt when the edit is really about location. If you catch yourself writing “the object on the left side, near the bottom, not the big one,” stop. Draw on it instead. That is exactly what AI Markup was built to replace.
The opposite mistake also happens. Some edits have nothing to do with location, a style shift, a mood change, a full palette swap, and trying to circle something for those just adds friction. Use Prompt to Edit directly for anything that is not fundamentally about where something sits in the frame.
What to Actually Do This Week
If you use Google Flow, open it and try the start and end frame control on one existing project before starting anything new. Pick two frames that are close in composition for your first attempt. Get a feel for how the model bridges them before pushing for anything ambitious.
If you use Photoshop, toggle into the AI Assisted Editor on your next edit and try AI Markup specifically. Circle something. Type a short instruction. See how it compares to writing the same request as a full text prompt. The difference is usually obvious within one or two tries.
Neither update requires you to abandon how you already work. Both just remove a step that used to require guesswork, describing a camera move in words, or describing exactly where an edit belongs. Less guessing. More pointing at what you actually mean.




















Join the discussion Tap to open the comment form +